Felt Christmas Tree Garland

Last year, I felt like our Christmas tree was missing something. It was filled with lights and ornaments but still did not feel full. It needed a garland and instead of making the tradition paper chains, I decided to make one out of felt so that we could reuse it year after year.

I cut colorful 1 inch by 6 inch strips…

 and glued the ends together with hot glue in rainbow order.

I made three separate strands so that it would be easier to work around the tree. (Actually I only string it 3/4 around the front. Shhh!) Between holidays, I use an embroidery hoop to store it and keep it from getting tangled.

Now, our tree now feels complete!

Our tree in 2014.
Our tree in 2017.

Save

Save

GUEST PEACE: Fabric Leaf Coasters

246676_4716433631114_1290277048_nJulie a fifty-something, married, full-time working mom of recent college grad Eric and college junior Ali.  After two years, she is starting to discover some good things about the life of an empty nester:  expanding from focus on the kids and career to her place in a larger world, with time to appreciate both natural and designed beauty.  So she crafts and bakes now whenever the inspiration strikes…. why not?

I needed coasters for our high rise condo and have always liked fabric coasters.  I searched online but couldn’t find fabric coasters that I really liked, so thought I’d try making some myself.  I wanted to add an organic touch to our contemporary decor, so I chose to make coasters that mimic various leaves:  maple, palm, gingko, etc.

1.  Sketched a few different leaf shapes onto felt and cut them out.

2.  Cut out a matching shape in a complementary felt color.
3. Embroidered the “veins” on the outward side of each felt leaf.  I used both metallic and matte embroidery flosses.4. Hand stitched the two sides together (right sides out) and embellished with a crystal droplet bead for a little bling.
I love how they turned out!  You can use different leaves or colors for different seasons.  Or different holiday themes:  Hearts, flowers, snowflakes, etc.  Maybe even initials or words.  They cost pennies to make and they’re both decorative and functional!

Save

Save

Framing a Milestone

Greeting cards…from birthdays, from showers, from graduations, stacked high in boxes, in the closet, in the garage, or not.  Maybe they collect for a day or so and then find themselves in the trash bin.  Yes, we have all done it with maybe just a little bit of guilt, or not.

cardscutouts-26The first Milestone Frame I ever did was after our wedding. This project lent itself nicely to this time as we had just celebrated a major moment in our lives and were beginning to build our home.  The same goes for baby showers and first birthdays as the parents I know are always looking for ways to decorate the walls of the nursery.  This current project is from the cards from Julie’s baby shower.
cardscutouts-2cardscutouts-6After gathering all of the cards from the occasion, I used a heart shaped punch to highlight certain pictures or patterns that I thought were interesting and in this case, cute!  Sometimes, I find entire pieces of a card to incorporate, like the letters, the bear, and the duckie.
cardscutouts-13The best part about getting a card is the message inside.  Before closing up the back, I wanted to make sure to preserve and include these well wishes.

cardscutouts-14
cardscutouts-composite1In this piece, the hearts took a very organic shape around the letters.  In others, I have used a more structured form.  On a side note, my favorite place to buy frames is IKEA.  This is the Viserum, but I also love the Ribba and the Sondrum.  The frames are classy, modern, come with matte board and are unbeatable in price!

IMG_00176
For my nephew’s room from the baby shower.
cardscutouts-27
For a first birthday.

As a gift or something you do for yourself, with happy occasions or even ones with grief, these Milestone Frames can serve as a constant reminder of all the love and support around you.

INSPIRED PEACE

Save

Save

Save

Guest Peace: Boxes for Form and Function

393197_10100930939217166_496989639_nLauren and I have been best friends for over 20 years and she is my “go to” person for any and all things crafty. Her technical mind mixed with a love of design makes for a beautiful and easy execution of whatever she decides to create. It only makes sense that she would be my first “Guest Peace”.  I’m sure you will be hearing a lot more from her here!

 About a year ago I finally decided to invest in a few of the brightly colored lacquer boxes and trays that I was seeing on all of the interior design blogs and magazines. But after looking around I realized that I could make them myself — in the colors and shapes I wanted and at a much better price! I had two small unfinished wooden boxes that I had saved from some of those lotion and body wash gift baskets that used to be popular, and I found another larger box at Michael’s. A few coats of spray paint and a couple more of clear coat transformed them into exactly what I was looking for.
LivingRoomThe hardest part was choosing the colors! I decided on a deep blue for my living room where I wanted a pop of color but something that could shift with my mood and the seasons.
Kitchen1 I chose black for the two small boxes. I knew I wanted one in my black and turquoise bathroom, and while I didn’t have an immediate plan for the other one, it’s found the perfect home sitting on my lime green vintage stove.
Bathroom2Even though I wanted the boxes as a decorative touch, they help me stay organized and corral bottles that would otherwise end up all over my kitchen and bathroom counters. They would make great housewarming gifts filled with new dish towels and fancy dish soap to make washing dishes a little more luxurious, or even a bottle of wine and cheese. The possibilities are endless!

Save

Save

Memories of a Wedding…Dress

WeddingOn May 1st, my husband and I celebrated our five year wedding anniversary! In honor of this special milestone, I wanted to share a way that my wedding dress has evolved since that time.

details037_compositeAround our one year, I cut my entire dress to shreds.  No…it was not out of anger and YES…I was terrified to do it.  What prompted me to do to such a thing was the thought of this beautiful dress stashed in the corner of our closet, only to gather dust and be forgotten. I wanted it to be a part of our everyday lives.

weddress-3My dress, although simple, had delicate fabric and beaded flowers scattered along the skirt and train.  They were a perfect part of the dress to display. For contrast and to make the embellishments stand out, I draped the ivory, flowered netting on top of a solid grey fabric.  They were then framed and hung over our bed.

weddress-1I think I can speak for most in saying that finding artwork for your home is really difficult.  Ideally, you want something that both reflects your style and has meaning.  This was a fantastic option to fulfilling both. Not only does this fit the look of our home, but when I walk into our room, I am reminded of our wedding day and how incredibly grateful I am for the last five years.

Wedding photography by Karen Nakamura

Save

Save

5 Minute Frame

A dear friend and colleague of mine will be a first-time grandmother to not one,  BUT THREE grandchildren this year!  I had been keeping an eye out to find frames to showcase all 3 grandbabies in her office.  Nothing was striking me, and so, I decided that I should start with something simple and elaborate on it.

framedphoto-3

My original ideas were to cover the entire matte board in some sort of print or cut out large paper flowers and put in the corners of the frame.  Going through my expansive collection of scrapbook paper to find inspiration, I came across a geometric pattern which happened to have wording applicable to the occassion.

framedphoto-1

I used the outline of the geometric shapes to cut out interesting patterns that could be glued right onto the matte board.

framedphoto-2

With minimal time or effort, this is a fantastic way to add a personal touch to your gifting.


Save

Save

Save

Julie’s Baby Shower

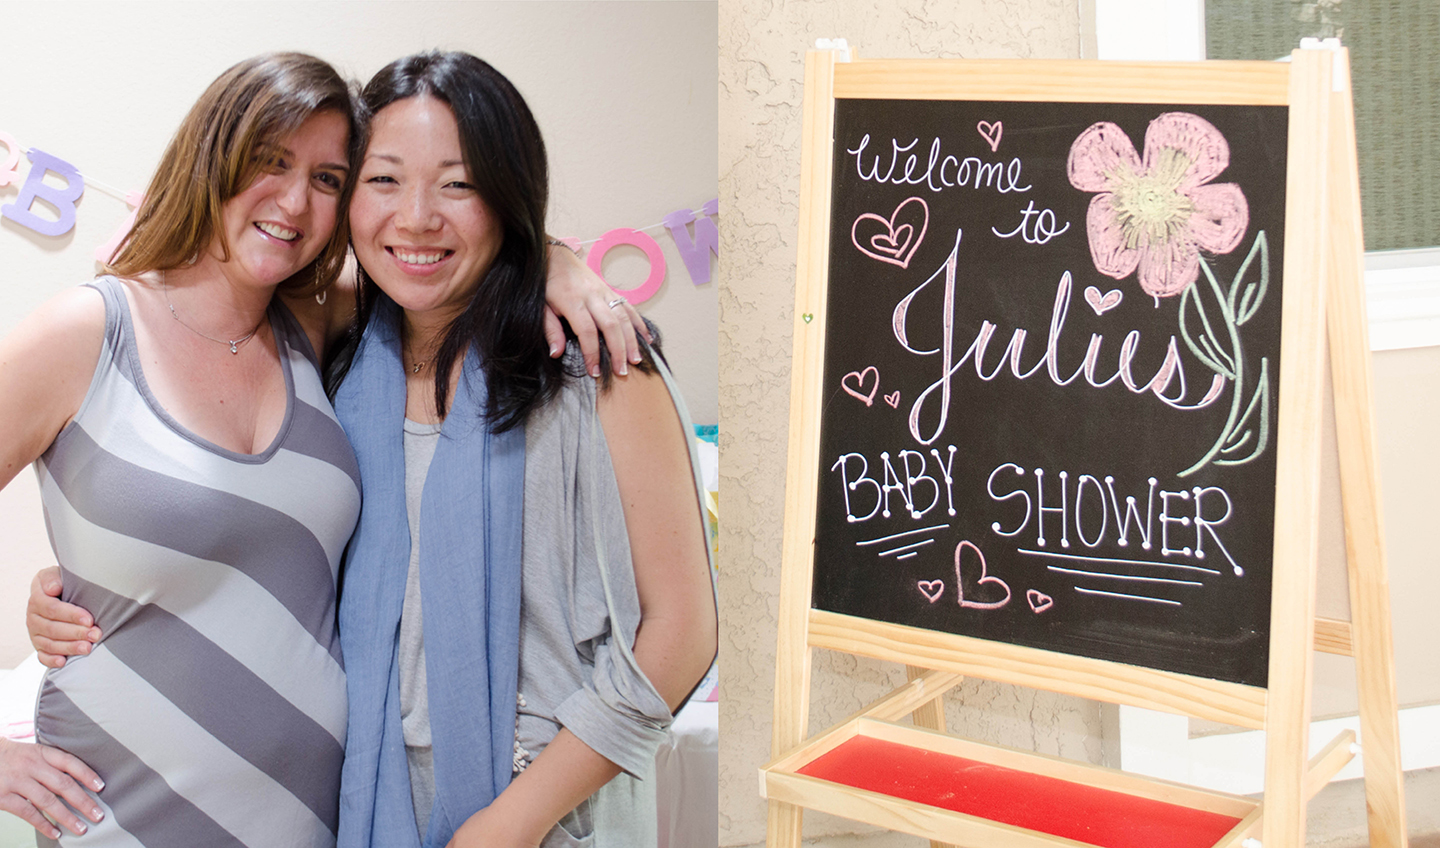
I had the honor of helping to throw a baby shower for my sister-in-law, Julie, with a wonderful group of ladies.

Baby Shower

There wasn’t one theme to the party, but many recurring touches: florals, hearts and chalkboards in pinks, greys and golds.  My toddler generously donated the use of her easel for the welcome at the door.

Composite3

You will soon learn that I have a thing for scrapbook paper.  I find the possibilities of its use endless.  These heart lanterns were made from 4 sheets of scrapbook paper and a couple sheets of tissue.

Composite2

The longer I throw events, the more I understand the value of creating sustainable decor.  With the help of my mother-in-law, Vicki, we made fabric flags using various prints and patterns that Julie can hang in the nursery.  The paper heart cut-outs surrounding the invitation were the scraps from the heart lanterns.

Elephants

From the fabric scraps, Vicki made these adorable stuffed elephants.

Florals

Using a random assortment of vases and a handful of flower bunches from the market, arrangements were scattered all around the house.  If you find arranging flowers a daunting task, use small and simple combinations with only a couple different types of flowers.

Composite7

More scrapbook paper!  Attached to sticks, you can plop them into centerpieces, in food displays and even use them to cover the tables.  These three platters are some of my favorites as the height gives the buffet spread a little more dimension.

Composite6

If there was one thing that was absolutely necessary, at this shower in particular, it was dessert!  Cari and Heather did a fantastic job with fruit skewers, dipped rice krispie treats and Oreo pops!

juliebs-33

Heather put together the “Headband Bar” and it was a great way to let everyone put their touch on a little gift for the new baby.

Composite5

This centerpiece is made with dollar store fake flowers and Honest Co. rolled diapers in their strawberry print.  Each of the planning ladies were asked to bring a onesie to make another element of decor that is adorable and functional. Go Dodgers!

juliebs-1

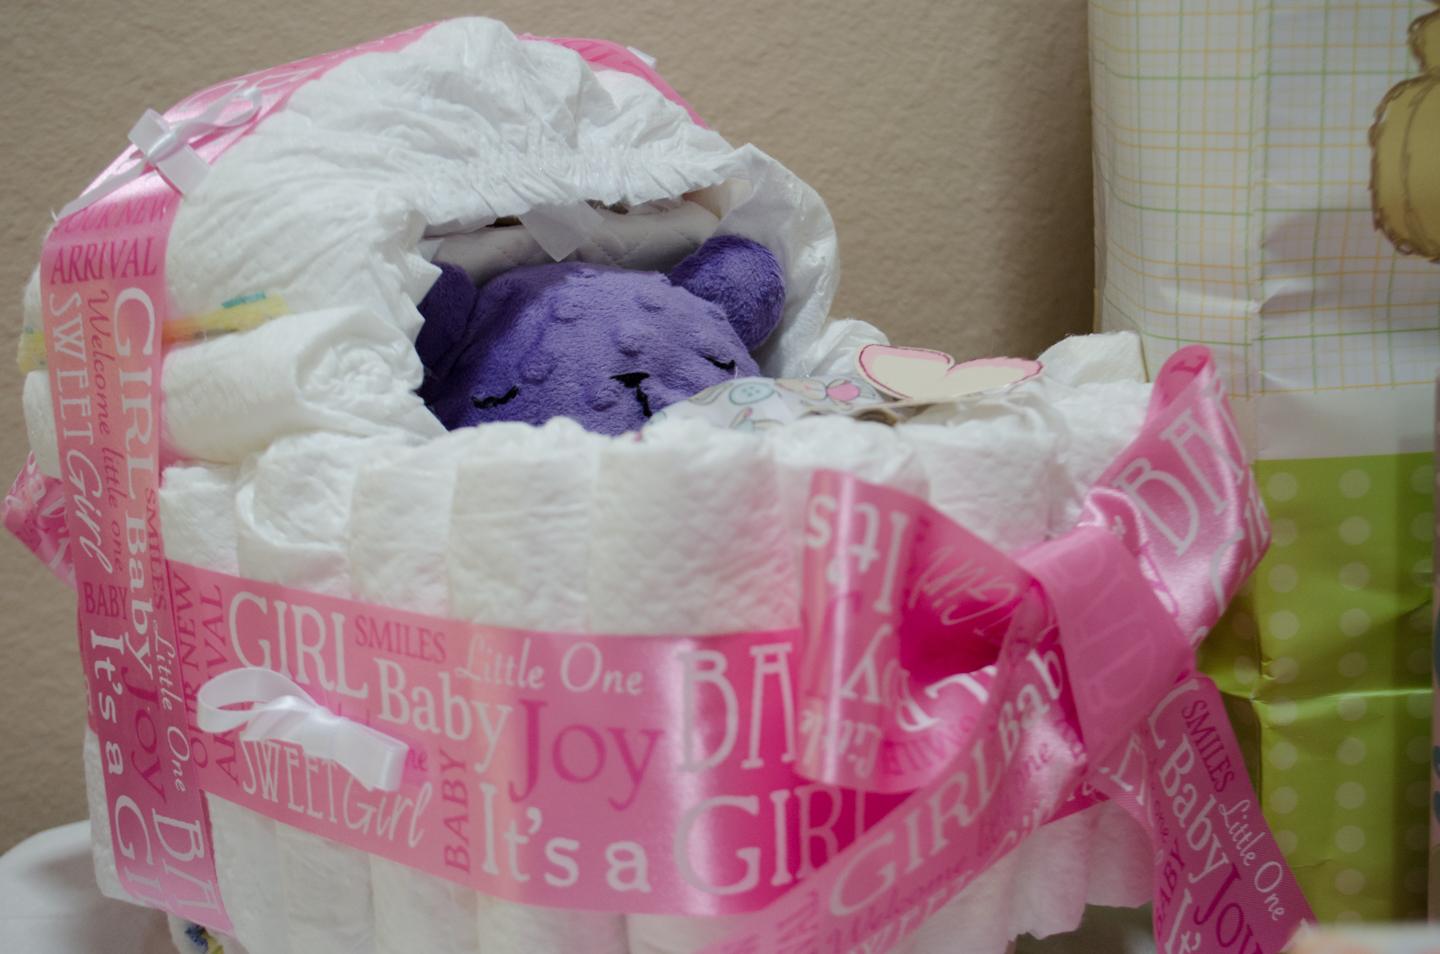
Vicki created a diaper cake and this little diaper bassinet!

Composite9

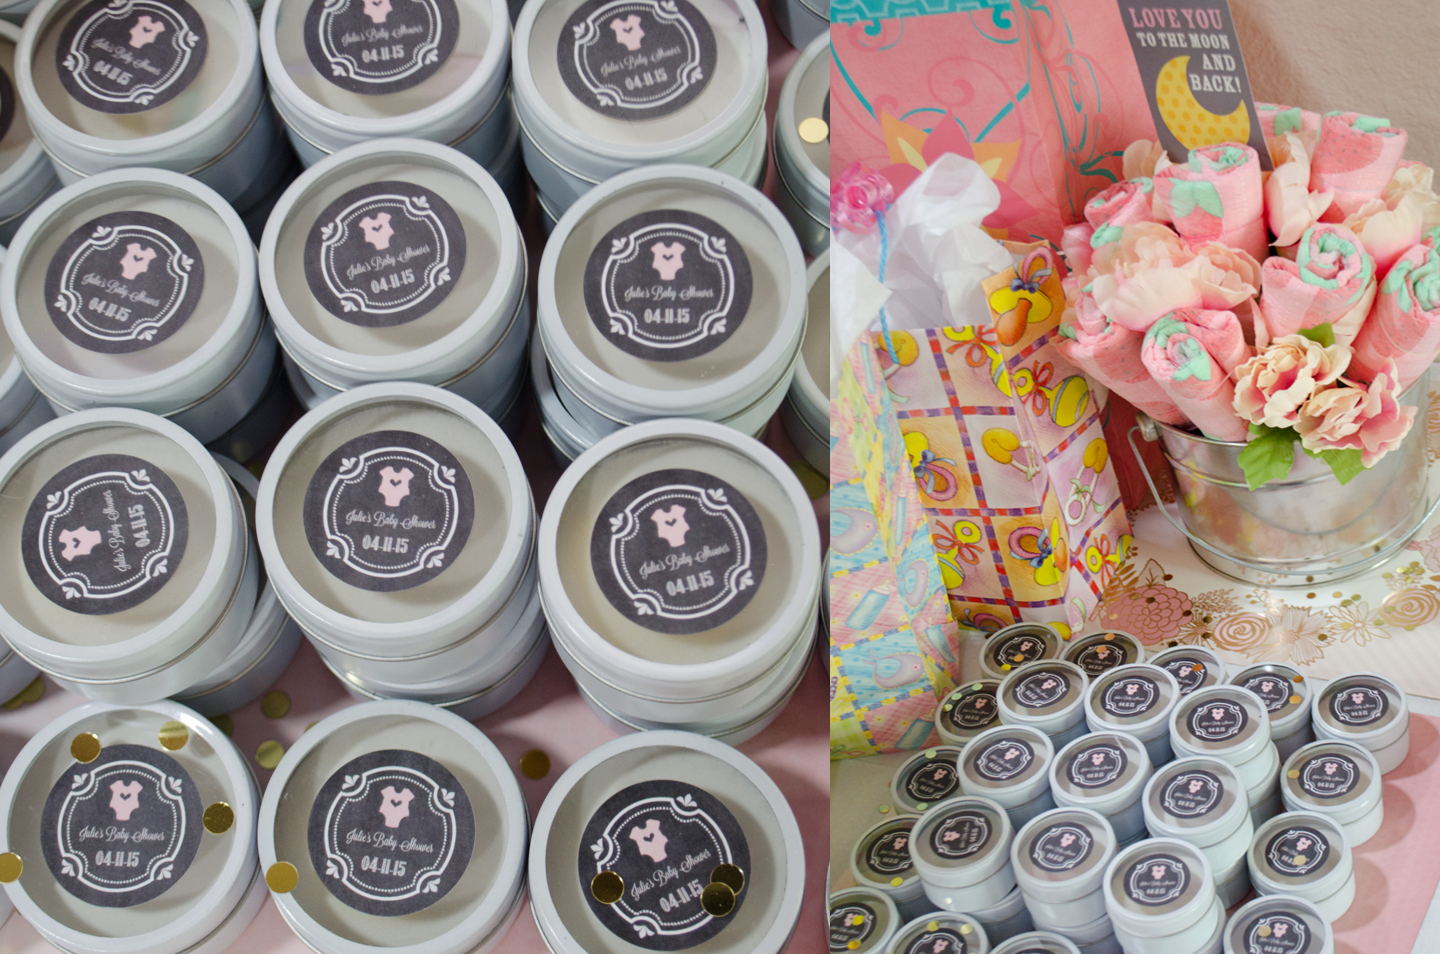
Incorporating the fonts and images from the original invitation, Cari took regular candles and made them into custom, elegant favors.

juliebs-200

If you couldn’t tell by now, Julie and Lance will be welcoming a sweet baby girl in July and we are SO excited!

Thank you for all your help, Vicki, Cari, Mary, Erika, Heather and Marcy!  I don’t think the day could have been more perfect for Julie, someone we love very much.

Save

Save

Totoro Party

My kiddo has been enamored by the Japanese animated film, Totoro, from the first time he saw it and we knew this would be the theme for his second birthday. Preparation started months before, not necessarily creating but brainstorming. This was not something I could run to the store and buy for, so I had to figure out how to create the best Totoro party from scratch.

Here are some supplies you can use to make your own!

sootsprites-2

Totoro-2+SS_forblog

More often than not, I start to create for parties without knowing exactly what I am going to do with them.  My motto is that you can always find a place for things as long as you are happy with the outcome.  The design of Totoro is so simplistic, it lends itself nicely to the imagination.  The soot sprites are a sort of dust bunny in the film.  What could be easier than googly eyes on a black poof ball!

totofavors_forBLOG

I hardly ever throw anything out from a previous event.  These buckets were the centerpieces at my daughter’s first birthday and I was able to draw a quick Totoro face with black marker and a little felt and use them for favors.  Tags made of Japanese inspired scrapbook paper completed the look.

Ellie's-2nd-Banners_COMPOSITEforBlog

Creativity definitely runs in the family.  My mother and sisters made the birthday banner, my cousin made the soot sprite cupcakes and my brother in-law took the photos at the park.

Ellie's 2nd 03.29.15 - 4

Ellie's 2nd 03.29.15 - 5

cupcakes1

Ellie's 2nd 03.29.15 - 9-10_COMPOSITEforBlog
tototys-4

I still love sending mail and I think people still enjoy receiving mail!  I found a pack of Totoro playing cards online and thought they would be a great addition to create custom thank you cards.

photos by cole-montgomery.com 

I could not have been happier with the way the decorations worked with the location and I am so incredibly thankful to everyone who made the day so special for our little one!

Save

Save

Save

Embroidery Hoops

Mixing lace and fabrics of different texture, I created a very economical and beautiful showcase of embroidery hoops for the entryway. Simply stretch your fabric across the hoop and tighten with the second ring.


   To create dimension, I embroidered our initial with metallic thread and made wool felt flowers.

Embroidery Hoops


Save

Save

Save

Save

Save

Save