GUEST PEACE: Fabric Leaf Coasters

246676_4716433631114_1290277048_nJulie a fifty-something, married, full-time working mom of recent college grad Eric and college junior Ali.  After two years, she is starting to discover some good things about the life of an empty nester:  expanding from focus on the kids and career to her place in a larger world, with time to appreciate both natural and designed beauty.  So she crafts and bakes now whenever the inspiration strikes…. why not?

I needed coasters for our high rise condo and have always liked fabric coasters.  I searched online but couldn’t find fabric coasters that I really liked, so thought I’d try making some myself.  I wanted to add an organic touch to our contemporary decor, so I chose to make coasters that mimic various leaves:  maple, palm, gingko, etc.

1.  Sketched a few different leaf shapes onto felt and cut them out.

2.  Cut out a matching shape in a complementary felt color.
3. Embroidered the “veins” on the outward side of each felt leaf.  I used both metallic and matte embroidery flosses.4. Hand stitched the two sides together (right sides out) and embellished with a crystal droplet bead for a little bling.
I love how they turned out!  You can use different leaves or colors for different seasons.  Or different holiday themes:  Hearts, flowers, snowflakes, etc.  Maybe even initials or words.  They cost pennies to make and they’re both decorative and functional!

Save

Save

Marbled Clay Craft Night

My first craft night, so generously hosted by Guest Peacer and invitation extraordinaire, Desiree from Heirloom Paper Co!

On the agenda: marble clay dishes and pendants from A Beautiful Mess. (For complete instructions see here and here.) On the menu: Blackberry Jam Fizzies, which were quite good.  I have never had a drink with jam in it before and it is the perfect amount of sweet.

For the dish, I picked turquoise, whites and just a hint of gold, black and light blue molding clay. Twist, loop and then twist again, over and over until the grain is the thickness you are looking for.

Roll into a ball, roll flat and cut out to the size dish you want.

Mold into the bottom of a dish and bake!

To make the pendants we simply cut out the shape we wanted from the rolled clay and baked with the dishes.

My favorite part was the discovery of this addictive gold paint. I used it to paint the edge and pump up the gold clay swirled in the dish.

Gold jewelry bails were glued to the pendant and then strung on a chain.

It was so much fun to see how everyone’s dish came out as they were all so different. I loved how the hot pink in my BFF’s dish pops and the black and white pendants looked like real stone.

I had a really good time crafting with one of my BFFs and meeting other talented ladies who love to craft as well.  Thank you so much for inviting me Desiree!


Save

Save

Save

Mammoth Love

About a month ago, my awesome family so graciously let us and our good friends use their condo in Mammoth Lakes, California. We wanted to do something to thank them as we had such a wonderful time there. Decorating for your home is a hard enough feat never mind decorating for your vacation home.  As I love the challenge of interior design, I thought that some custom made, Mammoth inspired pieces would be a welcomed addition.

If you are familiar with Mammoth, this symbol should also be familiar to you.

Using the same technique as my personalized pillows, I added on the Mammoth logo and a green heart to a pillow I found that matches their couch.
  

During our time there, my husband and I went on a mini excursion to capture the beauty and nature among the grounds of their condo complex in photos. I picked out these IKEA frames, a personal favorite, in this very rich but modern brown.

We picked out a handful of photos to have printed and put them in the frames. These days, it is so easy to take photos with our phones always handy, but don’t forget to take the time to print some of them.  You really can’t see all of the detail on your devices and I think you will be surprised at how much better they look printed.

While my husband took photos with his DSLR, I took the one of Lake Mary with my iPhone 6 and was amazed at the quality of the 8×10 print. Here are some of our favorite shots.

I was so excited to give these to my family because I know how much they absolutely love their home in Mammoth and I hope these gifts represent that love for them!

Save

Save

GUEST PEACE: Fiber.Spindle.Yarn

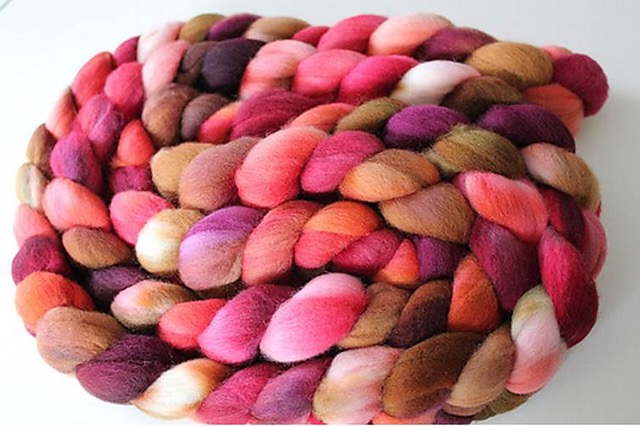
Laura is a 30-something California native who transplanted to the Midwest seven years ago with the love of her life. She isn’t always enamored of the cold weather, but she does love having a great excuse to knit and spin warm woolies. She is a knitter, spinner, podcaster and lover of all things creative.

I’ve been a knitter as long as I can remember. When I was 6 or 7, my grandmother taught me to knit. She patiently cast the stitches onto the needles and talked me through the process, helping me rip things out when I made mistakes and start again.

IMG_5896I knit on and off through my teenage years, but picked it back up again in college.  When I moved home after college, it was the early 2000’s and knitting and the fiber arts were enjoying something of a renaissance. Suddenly I wasn’t shopping at Michael’s any more, but at beautiful stores filled with nothing but yarn and fiber. 

One of the things I had never seen before was people taking fiber, whether straight from the sheep or processed and dyed in beautiful colors, and turning it into yarn. I was fascinated with getting to touch so many parts of the process. I decided to try it – I took a class on spindle spinning and created my first yarn, something that approximated boat rope.  I was fairly discouraged and went back to my knitting.

IMG_5890In 2010 I decided that I wanted to try again. I had made quite a few knitting and spinning friends online through Ravelry, and the spinners were posting gorgeous braids of fiber and even more gorgeous skeins of yarn.
Photo Aug 23, 11 40 08 PMI picked up my spindle again and practiced at it.  I had to learn how to handle the fiber. How to open it up and loosen the fiber (a process called drafting) so that I could then add twist to it and create a single strand.  Then I could wind multiple strands together (a process called plying) to create stronger yarn.
I spun happily on the spindle for about 6 months and then decided that I wanted to try a spinning wheel. I took a class at a local yarn shop and I got to sit at at least a dozen different kinds of wheels, and try my hand at spinning yarn.  I ended up with a petite wheel made by an Australian company, an Ashford Joy.
Photo Aug 23, 11 17 46 PMThese days I continue to spin almost every day.  I love purchasing colorful braids of fiber from dyers and turning them into one of a kind yarns. I sell some of my yarns in an etsy shop and others I use to knit my own sweaters and winter accessories and also to knit toys and gifts for others. I love photographing the entire process from fiber to knitted garment.

Love what you see? You can follow Laura on
her blog, The Corner of Knit and Tea,

Twitter

Instagram

And don’t forget to visit her Etsy shop!

Save

Save

Save

Save

Embellished Letters Part 2

A good friend has been searching for art ideas for her home and after the Keira letters, I couldn’t wait to try another set. The biggest challenge in this project was choosing a style that was refined and contemporary for their home, which was a lot harder than letters for a little girl’s nursery.

The walls in their house are grey and I thought the black letters would give a nice contrast. I was lucky to find this set of scrapbook paper with mellow geometric prints in a neutral and grey color palette.

 After tracing and cutting out the letters in scrapbook paper, I used spray adhesive to affix them to the front of the wood letters.

  One thing I really liked about these particular letters were that they stood up on their own. This gives my friend some flexibility in where she can put them in her home.

  Since the letters were already black, it allowed me to save time from not having to paint them and accented their depth.

  With all of the fronts of the letters on, it was time to add some decoration. I picked up some paper daisies, pearls, white twine, and metal-like embellishments and the stickers came with the scrapbook paper set.  Using craft supplies by Handmade Modern from Target, I painted the wood shapes gold and added some daisies and stickers.

 For me, this project was all about simple elegance.  I wanted it to look crafty but not kitschy, modern but not cold.  Honestly, it was not easy to find coordinating pieces to meet this vision, but knowing my friend and her style definitely helped.  The daisies instantly reminded me of her and I based my decor around them.   


Save

Save

Mermaid Princess

One of the hidden gems I have recently discovered as a parent are all of the local theater productions put on by kids. My daughter loves to watch live music and it doesn’t get better for her than to see other kids singing and dancing on stage. They are usually very affordable and just short enough to keep her attention. We went to see The Little Mermaid Jr. with some of her besties and I wanted to make something fun for them to wear during the show.

Believe it or not, all of my crafting supplies came from the dollar store. My idea was to make wands, but I couldn’t resist the matching crowns. I didn’t expect to use all of this stuff, but that is the luxury of shopping at the dollar store!

Sticking to an an “Under the Sea” color scheme, I tied extra ribbons to the wands.

I liked the star wands, but wanted the star to have a bigger presence. I cut out starfish shapes from the glitter foam and bunched and glue-gunned pieces of iridescent cellophane to the backs.

This was then glued to the star on the wand with a matching glitter foam piece to cover the back.

The starfish were finished with turquoise and lime sequins.

I used the same techniques with the crowns as I did the wands. Bunched cellophane pieces and ribbons added an ocean touch. I glued a ribbon to the inside base of the crown so the cellophane would not irritate their foreheads.

Jeweled necklaces finished the ensemble! Our little mermaid princesses wore the crowns throughout the entire performance and they waved their wands in applause for the very talented kids in the show.

Save

Save

Birthday Wish Book

A couple of posts ago, I told you about my Mom’s 60th Birthday in Vegas. At the brunch, I asked family and friends to write a quick birthday note for her, a memory, a birthday wish, or something they appreciate.

IMG_4656I found this collection of scrapbook supplies online.  Finding collections makes the process that much easier in that the decorative pieces and paper are already cohesive and coordinating.  I only added in a few more prints of paper that I thought would go with the existing prints.


My best friend and Guest Peace blogger, Lauren, is a talented quilter and inspires me to want to try it. However, I am not a huge fan of sewing on a machine, so I thought I would try my hands at some paper quilting.  This simple heart took a lot more brain power than I expected in trying to…make the pieces exact squares…with the right angles…to then create a heart the size I needed.  This small part of my project was a testament to how crafting very much uses both sides of your brain!

With the included stickers and letters of the collection, my paper quilting became part of the front, back and spine of my birthday wish book.  To try something a little different than the 6×6 or 12×12 scrapbook, I went with a half letter sized, three ringed binder with an already existing pink flower pattern. Now to begin with the birthday notes.  I thought about documenting my process in how I mounted and decorated each note, but really, this was my process in a nutshell: crafting chaos.
As you can see, we are a close immediate and extended family. Sometimes, it is easy to carry on in our busy lives and assume that our family knows that we love and appreciate them. I have found that even when you know you are loved and appreciated, it still means so much to actually hear or read it every now and then.  To everyone that contributed a note, my mom loved her book.  And the thing is, it could have been words on scrap paper and I think she still would have still loved it because it was more about what you all said than what it looked like.

Save

Save

Embellished Letters

I am an auntie again!  My adorable little niece is a week and a couple days old and to celebrate this new life, I wanted to share something my mother in law, Vicki, and I made for her.

Vicki told me that she got some letters from the craft store and would love my help in thinking of ways to decorate them for the nursery.
In brainstorming this process, I knew that I wanted multiple textures in order to keep the letters interesting and to give it a really custom and handmade feel.  After a very successful shopping trip, we picked up yarn, tulle, embossed scrapbook paper, glitter, adhesive pearls and chiffon flowers.

To cover the letters in scrapbook paper, trace a flipped over letter on the back of the paper.  After cutting it out, we used spray adhesive to affix it to the letter.  In a matter of minutes, it was dry.

Spray adhesive was also used to cover the “I” with glitter.  We used a couple coats of both just to make sure that there was an even cover of glitter.  Using white glitter on a white painted letter helped to disguise any holes, if there were any.Wrapping the letters in yarn and tulle was by far the hardest step.  I found that by wrapping in the long direction first, as pictured above, and then continuing to wrap in the short direction covered most of the gaps.  A glue gun also helped tremendously to keep the wraps in place as we went along.

Probably the most fun part of the process was embellishing each letter with the florals and pearls in a unique but cohesive way.


It was a challenge to mix so many different elements while sticking to one style.  One thing I try to do, is to pick one element that you really love and center your design around that.  The fabric flowers were one of the first things we found and our favorite.  Everything else we chose was based on those flowers.We can’t wait to see what they will look like up on the wall of the nursery.  I will have to post a photo when they are hung.

Stay tuned as I really want to try these letters again for a friend’s living room!

Save

Save

Personalized Pillows

It’s time for another felt project!  After making the Chicka Letters, I wanted to use the same concept to create personalized pillows for some of the dear little ones in our lives.

20150620-namepillows-01Using the same font but in a smaller size as the Chicka Letters, I printed and cut out letter stencils from the computer.

20150620-namepillows-02From my abundant supply of felt, I tried to pick complementary colors for each letter of the name.  I love this pillow cover because it allows the colors to pop and brings a youthful and modern balance.

20150620-namepillows-03In order to center the name on the pillow, I simply folded the pillow in half height and lengthwise and marked it with a pin.  This gave me a guideline to work from.  After placing all of the letters down, I then measured the left and right margins in order to make sure they were of similar length.  A plastic cutting board inside the pillow case allowed for an easier pinning session!

20150621-namepillows-05This is a case where an embroidery hoop really comes in handy because the pillowcase is pre-made.  Using the hoop kept the opening of the pillowcase wide enough to stitch in and out. And, it’s done!

20150621-namepillows-06


IMG_7065[1] IMG_7072[1]


Chicka Letters

20150607-chickaletters-04A told B,
and B told C,
“I’ll meet you at the top
of the coconut tree.”

At age 1, this was the first book our daughter absolutely loved and needed to read over and over and over again.  Correction, needed “US” to read over and over and over again.  I can still pretty much recite the entire book in my head.

I wanted to make the story more interactive for her and so, I decided to make the letters 3D.

20150607-chickaletters-10I picked a font that was fairly similar to the letters in the book, and printed out templates on plain pieces of white paper.  Using those as stencils, I traced two copies of each letter onto colored felt (I LOVE felt!) with black marker and cut them out.  I read that a chalk pencil works best to trace on felt, but didn’t have one.  A black sharpie it was!  And honestly, it worked fine.20150607-chickaletters-18With a needle and some embroidery thread, I did a quick, simple stitch around the letters anywhere from 1/8″ to 1/4″ apart.  I didn’t have thread to match all of the colors but used similar tones. A chopstick did the trick to push the stuffing down in long and narrow portions.

20150607-chickaletters-14

I have to admit, they came out pretty awesome and I learned from this process that felt is pretty forgiving.  Even though my cuts were not straight or my stitches were uneven, you couldn’t even tell. 20150607-chickaletters-07Needless to say, our daughter loves them.  For those of you familiar with Chicka Chicka Boom Boom, this is her favorite part of the book. Now, it is ten times better because she can throw all the letters in the air and yell, “Oh no!”

Save

Save

Save

Save